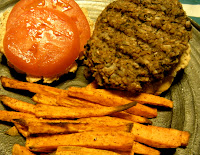
I need to be going to bed right now--but the seven hour marathon I just finished in the kitchen warrants, at the very least, a short blog entry. SO! Here it goes:
Dear Heidi,
Thank you for sharing your awesome blog, constantly giving me ideas and inspiration and--of course--delicious dishes.
--Rosalyn
Tonight, I cooked up a few things--but what I got to enjoy right away were my tofu burgers and homemade hamburger buns; oh, and french fries--made with my handy french-fry-cutter that my mom got me a little while ago.
The burgers? Easiest veggie burger I've attempted to make--and super satisfactory. The consistency was practically delightful to work with.
The buns? I think I've found myself a recipe, finally! Third times a charm, right? I was pretty close to giving up on finding a bun recipe that made me happy. I'm glad I kept on hunting. I followed the recipe pretty much exactly, which means they were made with only all-purpose flour; that's not generally my style, but I wanted to make sure the recipe turned out results that I wanted. Next time, I'm going to try and throw in a little whole wheat flour and see what happens.
Anyway--to bask in a bit of cook-therapy was great and my stomach was definitely happy with the results. More on this evening soon!
Sunday, August 19, 2012
Tofu Burgers
Labels:
comfort food,
easy dinner or lunch,
mushrooms,
Recipes,
tofu
Thursday, August 16, 2012
The Chronicles of Baking--pt. 3
I've saved the best for last!
So, my mom had sent me mini tart dishes so that I could make little quiches (which is actually what I plan on doing this weekend--more on that in a couple days, hopefully!) While I love quiche, when I discovered the tart dishes, I instantly thought of dessert. Up until this recipe, I had neither previously attempted to make or even eaten dessert tart. And, you know me, I was definitely up to the challenge.
After doing a little research, I discovered that most tart recipes call for kiwi and strawberries. Well, I don't like strawberries and I've never been able to figure out how to properly shop for a delicious kiwi, so I decided to just kind of wing it. I used this recipe as my starting point. I can't remember exactly, but it wouldn't surprise me if I cut the sugar in the filling to 1/4 cup (I cut back on sugar as much as I can--it really isn't as necessary as some would make you believe). I was definitely happy with the way the crust and the filling turned out! Next--the fruit topping.
I decided to use nectarines--because they looked tasty and ripe sitting in the bin at the grocery store! And instead of worrying about a glaze, I simply cut up the nectarine and drizzled some maple agave nectar over the top. (Maple was what I had on hand, although I'm sure that honey would have sufficed.) I then placed them on top of my filled tarts and sprinkled a little nutmeg over them for the final touch.
So. Good.
I've got witnesses if you aren't quite convinced--or you could just give the recipe a try! It's definitely a nice, not-too-heavy way to end a meal.
All right, that's all for tonight! I hope to be back soon!
So, my mom had sent me mini tart dishes so that I could make little quiches (which is actually what I plan on doing this weekend--more on that in a couple days, hopefully!) While I love quiche, when I discovered the tart dishes, I instantly thought of dessert. Up until this recipe, I had neither previously attempted to make or even eaten dessert tart. And, you know me, I was definitely up to the challenge.
After doing a little research, I discovered that most tart recipes call for kiwi and strawberries. Well, I don't like strawberries and I've never been able to figure out how to properly shop for a delicious kiwi, so I decided to just kind of wing it. I used this recipe as my starting point. I can't remember exactly, but it wouldn't surprise me if I cut the sugar in the filling to 1/4 cup (I cut back on sugar as much as I can--it really isn't as necessary as some would make you believe). I was definitely happy with the way the crust and the filling turned out! Next--the fruit topping.
I decided to use nectarines--because they looked tasty and ripe sitting in the bin at the grocery store! And instead of worrying about a glaze, I simply cut up the nectarine and drizzled some maple agave nectar over the top. (Maple was what I had on hand, although I'm sure that honey would have sufficed.) I then placed them on top of my filled tarts and sprinkled a little nutmeg over them for the final touch.
So. Good.
I've got witnesses if you aren't quite convinced--or you could just give the recipe a try! It's definitely a nice, not-too-heavy way to end a meal.
The Chronicles of Baking--pt. 2
Let's just forget about the fact that I haven't posted anything in what feels like a million years and focus on the fact that I'm not going back on my promise to blog about my weekend of baking!
Truth--I feel a kitchen weekend coming on; you know, one of those weekends where I cook, like, four big things in one or two days and take lots of pictures and then set aside time to blog about them. I'm actually really looking forward to it, because I haven't had a weekend like this in a while--but I thought I should tell you about the treats I made a couple months ago, now, as I said I would.
In part 1 I told you about the zucchini bread that I made. Now I'm going to tell you about the chocolate biscotti that I made. I found the recipe here. Maybe I didn't do something right, but it definitely didn't yield 50-60 cookies--in any case, they were pretty tasty. I would recommend using the best cocoa powder you can find--I didn't but could imagine how much better they would have turned out if I had.
What I really liked about this biscotti was that it was completely legit; I mean, there was no biting into these cookies if you didn't dunk them first. I made them with the intention of giving most of them away, and I warned my friends that coffee, tea, hot chocolate, or even warm water was necessary for the enjoyment of the chocolaty cookie.
Anyway, I enjoyed them--and the next time I'm looking to make biscotti, I won't hesitate to make them again. In fact, as I write this blog, I can think of a good friend who I promised biscotti to. This will be the kind that she gets!
Go ahead--give it a try. I doubt you'll be disappointed.
Part 3 is coming....right now! So stay tuned!
Saturday, June 23, 2012
The Chronicles of Baking--pt.1
I've been baking. A lot. And I've been thinking about this blog with every splendid thing that I make. I promise to share everything that I've ventured to create over the last couple of weeks. Starting now.
Welcome to the Chronicles of Baking. Part One: The Adventures of Zucchini Bread.
Remember my search for a banana bread recipe that didn't call for any sugar? Well, I was craving zucchini bread--something I've enjoyed before but have never ventured to make--and was wondering if I could find a recipe that met my somewhat-picky specifications. Bingo! It didn't take long for me to stumble across this recipe. (And it just so happens that this blog is where I found the banana bread recipe, as well!)
When I first made it and gave it a try, I wasn't so sure how I felt about it. I added dark chocolate chips, which definitely added something special, but I wasn't sure that I would love the bread all on it's own. But do you know how sometimes when you try something JUST out of the oven, you lose some of the flavor? Well that must have happened with this bread. Because each day that I had a slice, I liked it more and more. Now I think I have to say that I favor this zucchini bread over the banana. *eek!* Bold statement. Don't hold me to that!
In any case, it turned out beautifully--brown and accented with green--and I will definitely be using this recipe in the future.
Unfortunately, I didn't take any after pictures. (I was baking a few things that same evening...) So--I owe you photos. But try the recipe, really!
Sunday, April 29, 2012
Potluck
Hey guys! It's been such a long time. I'm glad to be back, though--and with recipes to share!
So my freezer load has dwindled down over the past several weeks; it's not completely empty, but I've reached a point where I think I can start making food again--and filling it back up with my stock of leftovers. Now, to be completely honest, I have made a few new and exciting dishes over the past month--butternut squash and baked rice casserole, alfredo and smoked gouda with spinach pizza, tempeh stir-fry, tempeh meatloaf--I think that's where my list ends, I promise! (Whoops. One more...smoked gouda mac-and-cheese....) The reason I haven't blogged about any of these things is because I couldn't make myself; it felt nice to just cook and then eat, not worrying about photographing everything. But--don't worry; I plan on making all of these things again, and I will share with you my experiences, my photos, and the recipes!
In any case, I found myself in the kitchen yesterday afternoon; before I knew it, the sun was long gone and it was way past dinner time. My kitchen was an on-again-off-again disaster as I did my best to clean as I went--but it was so much fun. It's been a while since I spent hour after hour in the kitchen moving from one project to the next, taking photos and squealing with delight when something turns out even better than I expected.
My church is having a potluck this afternoon. Everyone was asked to bring a main-dish and a side-dish or dessert, depending on where your name fell in the alphabet. Now you know me, I wasn't about to show up at a potluck with something simple, innutritious, or store-bought. My goal was to make something light, something with a bit of color, and--of course--delicious.
I decided I would make white bean basil hummus--something I have made in the past and found to be absolutely amazing--and homemade pita bread. It was my first time making pita bread, so I was pretty excited--especially because I was told that the flat bread would turn out really well if I used my baking stone. I doubled the recipe and used three different kinds of flour (because I find that if I try and make bread with half whole wheat and half all-purpose, it doesn't rise as well; so I used 3 cups of unbleached all-purpose, 2 cups of whole wheat, and 1 cup of white whole wheat.) Some of my pitas came out with amazing pockets; some came out with alright pockets that may need a little encouragement with a knife, but I'm very pleased with my results. They tasted great.
For dessert, I knew that I wanted to make a pie. My mom had sent me a pie dish that I have been wanting to use for weeks and I haven't found an occasion that warranted me making one.
This seemed like the perfect opportunity. I wanted to make something different than an apple pie and I wasn't finding recipes that I was crazy about--but then I discovered it. Pear Crumble Pie. After I saw it, I knew it had to be made. Why? Because who eats pear pie? Who has even made a pear pie? Who has even heard of pear pie? And I wondered...why don't people eat pear pie? There was only one way I was going to find out! It called for very few ingredients--one of which was an unbaked crust. I looked for a while for a recipe that didn't call for shortening. I don't like having to buy the stuff--because I don't end up using it for anything else. I wound up using this butter recipe, and it turned out beautifully. It was easy to handle, which is always good. Pie crusts can be such a pain! I haven't cut into the pie yet, because I'm saving it for the potluck, but I hope it tastes as good as it looks.
And--last but not least--my favorite thing about making pie is having leftover pie crust dough; my grandma always makes these little pie-cookie-things with the leftovers and I love them. And since this was a 2 pie crust recipe and I only needed the one, I had plenty of dough to cover in butter, cinnamon, and sugar. I baked it for a few minutes and then proceeded to enjoy way too many while I continued cooking!
Thanks for stopping by! I hope you're having a good weekend, and I'll be back again soon.
Labels:
butter pie crust,
pear pie,
pie,
pita,
white bean hummus
Saturday, March 31, 2012
Spaghetti and Tempeh-balls
I don't even know how to begin this post.
Last night, my roommate and I hosted our first dinner party. What can I say, besides the fact that our husbands are in for a treat--I mean, if we treat our friends this well, how much more will we lavish the men who promise us forever?
This Colorado March has been unseasonably warm; I keep waiting for the other shoe to drop--for a huge spring blizzard to ravage our trees and sprouting tulips, but it has yet to happen; in fact, it may not happen at all. Either way, we took advantage of the gorgeous evening and had dinner at dusk with a few friends. There was conversation, laughter, and the tangible potential for friendships to be had, kept, and treasured.
Oh, and food, of course.
My roommate made meatballs for the first time; I cooked with tempeh for the first time, contributing meat-less-balls to the meal. Both were had and enjoyed by all of our guests, along with homemade spaghetti sauce, whole wheat french bread, and made-from-scratch chocolate cake.
The night was delicious in every way, and I just had to share it with you.
I hope you all have a fabulous weekend. Thanks for stopping by!
Tuesday, March 20, 2012
Breakfast Scramble
The vegan breakfast scramble has become a staple for me. I love it because its super easy and fast, plus it allows me to use up some of the random things I sometime have left over from other recipes. I always seem to come up with things like, a hand full of spinach (not enough for a salad) or half a block of tofu, or a quarter of an onion, a ripe tomato, etc.
Today, that is exactly what I had! I also had the nub end of some gimme lean sausage (yum!) So, I threw it all together in a pan, added a little bit of garlic powder, chopped up some fresh fruit, and had brunch.
Honesty, I could eat this meal for breakfast, lunch, or dinner.
Let me know what you like to put in your breakfast scramble!
- Megan
St. Patty's Day - Vegan Corned Beef
I have to admit, I never ate corned beef as a meat eater, so I cannot honestly tell you if this resembled the real thing.
My Irish husband grew up eating it, and I am proud to say that he was impressed! The recipe can be found over at The Fat Free Vegan Kitchen. I made a few adjustments (I always do, based on what I have on hand). I sliced a veggie burger to use as the "beef," and because I am not a huge fan of cabbage, it got left out. I only seasoned the potatoes with a little bit of oil and salt before popping them in the oven.
This dish was a great way for us to celebrate the holiday and I will definitely make it again next year! (Probably with even more adjustments!) I love starting new traditions, and since we won't drink the green beer, I'm keeping this recipe around for a while. I might even make this more than just for St. Patty's Day!
Happy Tuesday!
-Megan
Sunday, March 18, 2012
Whole Wheat Pizza!
I think I'm going to have to make pizza at least once every couple of weeks. It's been decided.
Last night, I had some friends over for dinner; it ended up being one of the best social food events I've ever been to. We socialized over a couple bottles of wine, we ate, we laughed (hysterically, occasionally) and created memories that will not soon be forgotten. The pizza was one of the most beautiful dishes I've ever made and tasted even better--thanks to my baking stone!
And then...dessert.
Vegan, chocolate, raspberry, Kahlua cake. At first, it was just going to be vegan chocolate cake. Every new idea made the cake better and better.
Last night? Best St. Patrick's day ever--who says you have to go out to have a good time?
Rosalyn
Last night, I had some friends over for dinner; it ended up being one of the best social food events I've ever been to. We socialized over a couple bottles of wine, we ate, we laughed (hysterically, occasionally) and created memories that will not soon be forgotten. The pizza was one of the most beautiful dishes I've ever made and tasted even better--thanks to my baking stone!
It was my first attempt at pizza dough and, just as the recipe promised, it was amazing.
I topped it with homemade pizza sauce, mozzarella, goat cheese and sauteed mushrooms, garlic, red bell pepper, and spinach.
It was gone in no time.
And then...dessert.
Vegan, chocolate, raspberry, Kahlua cake. At first, it was just going to be vegan chocolate cake. Every new idea made the cake better and better.
We decided to add the Kahlua after it was done baking.
Then we decided we should drizzle it with dark chocolate. Then we decided that we should add homemade raspberry sauce to the topping.
And oh-my-gosh was that cake delectable. And easy!
Last night? Best St. Patrick's day ever--who says you have to go out to have a good time?
Rosalyn
Saturday, March 17, 2012
Almond, Bean, Grain Burgers
Rewind back a week.
It's Friday night, I'm waiting for my roommate to finish up in the grocery store and I'm talking to my mom on the phone in my car. As usual, we're talking about our cooking plans for the weekend. She intends to make quinoa fritters--for, like, the third time! I told you she'd love them--and I tell her I intend on making Almond, Bean, Grain burgers.
She immediately sounds skeptical. "That sounds weird," she tells me.
If you knew my mother's cooking history, you'd understand why I scoffed at her reply. "You think it sounds weird? You have no room to speak."
"I know, I know--you're right," she concedes. But she's still not convinced about my burgers.
Well, this post is dedicated to my mother (here is where I insert a shameless plug: check out her homemade greeting cards, here.) Mom--I told you they'd be delicious!
My roommate and I had ourselves the perfect friday night meal--my veggie burgers, her sweet potato fries, and tasty wheat beer. Mmm...got to love a night in with made-from-scratch deliciousness. Definitely give this burger a try. I found the recipe here. I didn't make the sauce, because I don't like strawberries. I put mustard on my bun and that was all I needed! (My roommate enjoyed hers with a bit of ketchup, and was equally satisfied!)
Now, fast forward to the present. Tonight, I plan on making my first homemade pizza dough. My mom got me a baking stone for my birthday (because she's so great!) and I'm going to break it in this evening. Hopefully all goes well. I'll try and blog about it tomorrow.
Then...if you don't hear from me for a while, it's because my freezer looks like this:
I've got some eating to do.
I was on the hunt for tempeh recipes just the other day and my roommate told me no--not until April. She's right...
Have a great weekend!
Rosalyn
Saturday, March 3, 2012
Whole Wheat French Bread
As I type, my bread is baking. This is my second attempt at making french bread, and I think it's going to be far more successful than my last try--and because I'm feeling so confident, I've got this list of things I now want to make from scratch today.
There are a couple reasons why I think this recipe worked better than the last; first, because I broke down and bought some all purpose white flour (unbleached! Because, it makes me feel better that it's not whole wheat...) Also, I used yeast from a jar; I'm suspicious that the yeast I used out of a packet last time wasn't a fresh as the yeast I used today.
Anyway, my loaf is huge! And I love it. I hope it tastes as great as it looks. Here's the recipe.
Adapted from Famous French Dessert's recipe.
Ingredients:
2 cups Whole Wheat Flour
3 cups All Purpose White Flour
1 Egg
1 tbsp. Sugar
2 tsp. Salt
1 tbsp. Dry Active Yeast
Directions:
1. Sift the two flours together into a large bowl (I would mix 2 cups whole wheat flour and 2 1/2 cups all purpose flour, adding the extra 1/2 as needed). Mix in salt and sugar. Move the ingredients to the sides of the bowl, creating a large "well" (an empty space) in the middle.
2. Pour the yeast into the "well" and pour 2 cups of lukewarm water over the yeast. Sprinkle about 1 tbsp. of flour over top. Wait (about 10 minutes) for bubbles to appear in the yeast.
3. Once the bubbles have appeared, you can start to mix together the ingredients (hands work best) to form the dough. The best way to do this, is to gradually incorporate the flour that is "waiting" on the sides of the bowl. Doing it all at once will be too difficult. So, go bit by bit, if it's too liquid, just add a bit more flour at the end. You should finish this "pre-kneading" stage with a round, firm ball of dough. Again, if it's too sticky, add a little more flour.
4. Kneading: remove the bread from the bowl and place on a lightly floured surface. Knead it by pushing your palms into and then turning it one quarter. Keep kneading and doing quarter turns for about 5-10 minutes, or until the bread is supple and non-sticky.
5. Place the bread in a lightly floured bowl and cover with a damp dish cloth. Let it rise for about 2 hours (depends on the room temperature, you want it to be fairly warm). It should double in size.
6. Preheat oven to 400°F. Re-sprinkle a counter top (or other surface) with flour. Prepare a baking pan by lightly oiling and flouring it (or bake on top of parchment paper). With your hands, remove bread and place on floured surface. Knead and then flatten into a circle; fold over the edge, pressing the rim into the remaining dough; repeat, until you have a log and then pinch the flap with the bottom so that the dough is one piece. Roll back and forth the create a long loaf. Put the loaf on the pan. Cover with a dish towel and let rise for 30 more minutes. Using a sharp knife, cut diagonal lines across the top of the bread. Whisk the egg, and using a brush (or a teaspoon) coat the top of the bread. Put in oven and bake for 30 minutes (more or less, depending on how much you like it browned).
So, I tried a piece...yeah, I'm definitely going to have to toot my own horn on this one.
More on today's cooking adventures coming soon!
Friday, March 2, 2012
Spicy Tofu Stir-fry
It makes me happy when I'm craving something and I just so happen to have the ingredients to throw it together and satisfy my taste buds. Tonight--I wanted stir-fry. When the craving hit, I immediately mentally sorted through the contents of my fridge. Tofu, red bell pepper, onions, garlic; I knew my pantry housed some rice and some soy sauce and figured that those things tossed together would be sufficient for my recipe.
Then I thought of my roommate and fellow blogger (Follow her blog, A Fine Gourmance!). We had already made plans to stay in for the evening so inviting her to enjoy some of my stir-fry seemed like the appropriate thing to do. She was all for the idea and offered to supply the recipe with asparagus, sriracha, and stir-fry sauce. As soon as I got home from work, we got to cooking. Our collaboration in the kitchen resulted in the best possible outcome for the stir-fry I had been dreaming about all afternoon! It was delicious.
What I'm most proud of is how the tofu turned out. This was my first time cooking tofu for the sake of having tofu. All the other times that I've used it, I've hidden it--in cheesecake, in lasagna--it always ended up mushed in with other ingredients so you didn't even know it was there. Tonight, I wanted it to shine. I was surprised by how well it held up through the whole cooking process; and I'm happy to report that my first attempt at cooking tofu was a success. My roommate said, "I'm just so surprised by how delicious this tofu is; it's perfectly juicy, it's not dried out--it doesn't taste like rubber, which I've experienced before." That my friends is a high praise from a non-vegetarian.
Anyway, enough about me, here's the recipe!
Spicy Tofu Stir-fry
Ingredients:
1 package of firm tofu
1/2 of an onion
1/2 of a red bell pepper
1 1/2 cups of chopped asparagus
1 carrot
3 cloves of garlic
2 tablespoons Worchestire sauce
1 tablespoon Soy sauce
dash of ground mustard
dash of thyme
dash of black pepper
dash of crushed red pepper flakes
dash of basil
2 tablespoons stir-fry sauce
Olive oil (for frying)
Sriracha (to taste)
1 cup of rice
Directions:
1. Drain the tofu of as much water as possible; marinate in the Worchestire sauce and a bit of sriracha--set aside while you cut onion, bell pepper, asparagus, carrot, and garlic. Set vegetables aside.
2. Start cooking your rice. (We used white rice, because my roommate has a ton she's trying to get rid of, but I'm sure it would be great over brown rice or--oh!--quinoa.)
3. Slice the tofu into strips for frying, fry in the olive oil until both sides are browned; set aside. (If you would like to have smaller chunks in your stir-fry, you can either cut them smaller before frying or after frying. I waited until after so that it would be easier to flip them their first time in the pan.)
4. Pour the soy sauce over the vegetables and then add the spices; mix well.
5. When the rice is just about done, sauté the vegetables and the tofu; add the stir-fry sauce. Cover the mixture for a few minutes in order to let the vegetables get soft.
6. When the carrots have softened to your liking, you're done! Spoon the vegetables over the rice, add a bit of sriracha for a little spice, and enjoy.
That's all for now!
Maybe tomorrow I'll blog about my french bread and cracker making adventures--we'll see...
Have a good night :)
Labels:
easy dinner or lunch,
healthy,
Recipes,
scrap cooking
Thursday, March 1, 2012
Portobello Steak.
The other night I decided that we needed a little luxury to go with dinner. When I think of meat eaters eating steak, I think expensive, marinated, something the cook is proud of because they spend a lot of time on their own special recipe. Honestly, I never liked steak when I was a meat eater. I must have never had it cooked just right, or flavored to perfection. It was tough and I would have rather eaten just about any other slab of meat. Those days are long behind me, thankfully, but the idea behind a good steak is still there. The traditional meat and potatoes meal still beckons to me sometimes. This is why I am so thankful God gave me mushrooms (and sometimes, I am pretty sure he created them with me in mind).
To cook the perfect portobello steak you will need:
Whole portobello mushrooms
Vegetable broth
Yellow onion
Salt
Pepper
I happened to have on hand a special blend of spices from The Savory Spice shop in Colorado Springs called Cantanzaro herbs which is made up of garlic, lemon peel, marjoram, basil, mediterranean thyme, rosemary, and oregano. All of these spices would be good alone or paired.
Start by sautéing the onions in the broth. When the onions are translucent and melt in your mouth juicy, add the portobellos and a little more broth if it has evaporated from the pan to prevent sticking. Cover the pan with a lid and let the whole thing simmer for about five minutes. Flip over the mushrooms and cook for another five minutes.
Plate the hot mushrooms and spoon a little of the broth and onions over the top. Serve the beautiful steak with baby potatoes and asparagus, steamed greens, or your veg of choice.
I am pretty sure this was one of my husbands favorite dinners I have made yet. I am pretty pleased.
Enjoy!
Megan
Wednesday, February 29, 2012
Hello Joe.
Tonight for dinner, I made the tastiest, most wonderfully sloppy, sloppy joe. *Swoon*
He was handsome, spicy, flavorful and filling. He kept me wondering what the next bite would bring, and had me begging for more.
Maybe that's a little dramatic, but tonight I learned that I make one heck of a good vegan sloppy joe. My joe consists of tempeh, mushrooms, onions, ketchup, mustard, brown sugar, garlic powder, red pepper flakes, salt and pepper all piled onto a whole wheat bun.
Really, this is as close as I can get without settling for something like fake meat crumbles (which I have sort of grown to despise). If you have an appetite for sloppy joes, please give this recipe a whirl and let me know how it turns out!
I'm off to have seconds!
-Megan
Quinoa Fritters
I love it when I take a bite of something that I've just made and my first thought is, "Mmmm," and my second thought is, "My mom would love this."
My mother and I have a special appreciation for quinoa. I remember when she first introduced it to me--I was in high school and she had made these quinoa burgers that were to die for. Or at least I thought so. (My younger brother hates quinoa; I believe the last time I mentioned I was cooking some and I had invited him over, he assured me that if I gave him any he would throw it in my face...) Now that I'm on my own and a vegetarian and constantly trying out new recipes, every time I spot a recipe that calls for quinoa, I stop and investigate. And every time I make something with quinoa that tastes delicious, I have to tell my mom.
She'll definitely be hearing about these fritters! I found the recipe HERE. I made a few changes, though; instead of feta cheese (which I really don't like) I used gouda (which I really love!) but I bet these would be great with goat cheese, as well. And in the end, they were a little too salty for me (I'd probably be fine with 1/2 teaspoon of salt) but the sauce helped even things out a bit. I'll definitely be keeping this recipe--and if you're a fan of quinoa, I suggest you give it a shot!
That's all for now!
Wednesday, February 22, 2012
Spaghetti Squash--with a Twist
I didn't want to cook tonight. I haven't been feeling well for the past few days and spending time in the kitchen sort of interferes with my plans to lounge around in my bed. But I haven't had a legit meal for dinner all week, so I made myself get in the kitchen.
I'm glad I did. Here's the recipe!
Have a good night!
-Rosalyn-
Sunday, February 19, 2012
Stuffed French Toast
I've been craving french toast, lately. This morning I decided I had been craving it long enough, so before church I started the dough for some whole wheat french bread. Hours later, I discovered that I wasn't crazy about the recipe. It had been my first attempt at making french bread and, a common issue I face when I'm making artisan bread with wheat flour, my loaves didn't grow as much as I wanted them to. They tasted fine, but I wasn't sure how satisfying the slices would be as french toast.
Then I got to thinking. What if I stuffed my french toast?
After a few minutes of internet searching, I had gathered enough information to just wing it. I had some left over cream cheese that I mixed with a dash of cinnamon; I spread the cheese on half of the slices I had, sandwiching them with the other half; I dipped each side into my 2 egg, 1/2 cup vanilla soy milk, dash of cinnamon mix, and then placed each serving in my George Foreman panini press. Five minutes later, they were done. I drizzled a bit of maple flavored agave nectar over the top and discovered that my stuffed french toast was the best idea I have had all day. The sweet nectar with the flavored bread paired with the unsweetened cream cheese was delicious. I bet when I find a french bread recipe that I love, it'll turn out even better. But for now, I'm content.
Craving satisfied.
Thursday, February 16, 2012
Whole Wheat Biscotti
You know what I love most about my new eating/cooking habits? Nights that look a little something like this:
I had made plans with a friend to come over to my place. We hadn't seen each other in a while and a catch-up-session was in order. Once we agreed on a time, she informed me that she had some homemade chai she could bring over for us to enjoy. She then proceeded to ask me if I had any cookies or treats that we could pair with the chai. I didn't, I told her, but wondered if I had anything to throw something together. Biscotti was the first thing to come to mind. I'd never made it before, but had seen recipes for it over the past several months and thought it'd be easy enough to throw together. Sure enough, within five minutes I had s simple recipe at my fingertips. I assured her that we'd have something to pair with our chai, and our date was set.
As I was making the biscotti, I thought more than once that I wasn't doing something right. It didn't look very attractive and I was unsure about whether or not my dough was the right consistency. As I stuck it in the oven for the first round of baking, I checked on it a few times--suspicious at the substance I had molded and plopped on a baking sheet. Fifteen minutes later, the smell wafting from the kitchen boosted my confidence.
Turns out, despite their less than perfect shape, my whole wheat vanilla biscotti was delicious! Especially dipped in my friends homemade chai--who just so happens to be the co-author of a new food blog. You can find the recipe to the chai mix if you click here. I definitely plan on mixing up my own batch of chai this weekend to enjoy with the leftover biscotti!
Whole Wheat Vanilla Biscotti
Ingredients:
2 cups white whole wheat flour
1 teaspoon baking soda
1/2 teaspoon salt
3/4 cup sugar
3 eggs
1 1/4 teaspoon vanilla extract
Directions:
--Preheat oven to 350 degrees
1. Mix together the dry ingredients.
2. Add the remaining ingredients with the dry and mix well.
3. Divide the dough in half. On a greased baking sheet, form 2 logs--as long as your dough will allow (10-13 inches).
4. Bake for 25 minutes then cool on a rack for 5 minutes.
5. Slice along each log at 1/2 inch intervals.
6. Return the slices to the oven for 15 minutes, turning once.
7. Cool completely.
I think biscotti is my new go-to dessert. I've already found a recipe for chocolate biscotti that I can't wait to share. But, alas, that's all for now.
Rosalyn
Wednesday, February 15, 2012
Whole Wheat Banana Bread
It's been quiet in the kitchen.
I've been a very busy girl. I recently just published my first book (yippy!) and have been a little bit preoccupied. I've been enjoying leftovers, trying to clean out my freezer so that I can fill it up again. Even half of my groceries, apples for applesauce, bulgar wheat for almond veggie burgers, quinoa for fritters, and more--all purchased with me under the impression that I would be spending time in the kitchen--have all just been waiting to be used.
They shall wait only a little while longer. Hopefully I'll have tons of new experiences to share with you in the next couple of weeks.
However, just because my kitchen has been quiet does not mean that it has been silent. I have made a couple things here and there to quench my appetite. Banana bread being one of those things. I made it last week and shared it with some friends. I promised one in particular that I'd blog about it so, here I am.
A while back, I spent a considerable amount of time hunting for a banana bread recipe. There was a reason I hadn't made it in months--that being, most of the recipes I found called for a heaping amount of sugar. I couldn't help but think to myself, I put that much sugar in cookies! Why do I need to put that much sugar in my bread? I needed a recipe that would leave me satisfied with the taste of my bread, yet not worried about the nutritional content. After a number of disappointing finds, I found one that appealed to me.
Now, I used to not eat bananas very often. Actually, I have been eating more bananas over the past few weeks, but I find it very difficult to do so--they go bad before I can eat them all; which is okay if I have it in mind to make banana bread, but it's not okay when I'd just like to enjoy all my bananas! In any case, I've forgotten where I got the recipe because, by the time I had bananas ripe enough to make the bread, it had been months since I discovered it. However, I do have the recipe to share! My friends and I all enjoyed the finished product. I will not hesitate to make this healthy version of banana bread in the future.
WHOLE WHEAT BANANA BREAD
Ingredients:
2 ¼ cup whole-wheat flour
¾ teaspoon baking soda
¼ teaspoon salt
3 ripe bananas, mashed
¼ cup plain yogurt
¼ cup honey
2 eggs
1/3 cup oil
1 teaspoon vanilla
Directions:
1. Preheat oven to 350 degrees and grease pan.
2. Whisk together the flour, baking soda, and salt.
3. In a separate bowl mix mashed bananas with yogurt, honey, eggs, oil, and vanilla.
4. fold the banana mixture into the flour mixture until blended. Do not over-mix.
5. Pour batter into prepared pan.
6. Bake large loaf for 40-50 minutes or until it comes clean with a toothpick.
I'll post pictures soon!
P.S: if you'd like to know more about my book, check out my website, here. And if you'd like to purchase my book, you can buy it here!
Friday, January 27, 2012
Vegan Apple Sauce Pancake with Berries
If you are looking for an easy (and beautiful!) breakfast, this is it.
This pancake is made up of 1 cup whole wheat flower, 3/4 cup vanilla soy milk, 1 tbsp baking powder, and of course 1/4 cup applesauce. Spread on some Earth Balance and top with your favorite berries! Yum!
Pretty food is always better!
-Megan
Saturday, January 21, 2012
French Onion Soup in a Whole Wheat Bread Bowl!
A few months ago, a friend and I decided that we wanted to see the movie One Day. But, knowing it was based off of a book, we agreed to read the book first. Somewhere along the line, we decided on one winter's night we'd need to get together for dinner and watch the movie with a meal--soup in a bread bowl. Don't ask me why, but soup in a bread bowl just seemed the perfect choice of meal to pair with a movie based off of a book.
We made this plan before I became a vegetarian; before I started making just about everything from scratch. Tonight, we finally got around to seeing this long awaited movie--and I had an excuse to make and consume an entire bowl of bread. The movie was barely okay, but the meal was pretty awesome.
I found the recipes here; and while I think I'd use less onion next time--I enjoyed it all the same. There is something about homemade food that tastes so much better than anything you can get when you're out somewhere. I would definitely give these recipes a try the next time you're craving comfort food on a cold winter evening!
I made croutons out of the bread bowl filling so I can sprinkle them over the top of my leftover soup tomorrow. And now, I'm officially taking a break from the kitchen--at least until tomorrow!
Rosalyn
Cinnamon Applesauce
Three words: De-Lic-Ious.
Homemade Cinnamon Applesauce:
Ingredients:
7 apples (I used 4 Gala and 3 Golden Delicious, because I like sweet apples!)
1 cup water
1/4 cup brown sugar
1 teaspoon cinnamon
1/2 teaspoon nutmeg
Directions:
1. Cut and peel your apples of choice.
2. Combine apples with the rest of the ingredients in a pot, and cook over medium heat until the apples are soft; about 20 minutes.
3. Mash! I put mine in a blender, because I don't like chunky applesauce--but you could use a potato masher, too.
4. Enjoy! I tried it when it was warm--it smelled so good I couldn't wait. It was delicious. I'm sure it'll be just as tasty cold, too.
I'm on a roll today. Stay tuned! French onion soup in a made-from-scratch bread bowl, coming soon!
Rosalyn
Subscribe to:
Posts (Atom)